Wednesday 31 March 2010

WWG Sedan Cars

The designers at World Works Games must really like this model as it is one of their most ubiquitous vehicles, appearing as a taxi, a police car, and, in slightly modified forms, a hearse and a stretch limousine, as well as the sedan cars shown here. Hey, if you have a winning design then stick with it!
These cars appear in the Mayhem Bank set in the colour schemes shown here, blue and crimson. There is also a kitbash set of Sedan Cars designed by Bob Cooper, which offers a further eight colour schemes - black, blue (a different shade to the one shown here), green, pink (yes, honestly!), purple, red, white and yellow. I have not made any of these yet but they are on my "to do" list. I just wanted to get these two under my belt first before I start on the rest of the fleet.
As you can see, these are four-door sedan cars. You can see from this side-on view how the back of the car is raised higher than the front.
This rear view shows how the sides of the car are sloped, narrow at the top and wider at the bottom. Sadly, they both come with the same number plates. ABC123 is not the most imaginative of number plates, now is it? Still, as this is my only gripe about the model I can't grumble.

This is a fairly easy vehicle to make and I made these in two to three hours. Having made them, I can fully understand why the WWG designers like this vehicle so much. Its simple design lends itself to conversion and modification. The bigger your gaming board, the more of these you will need to populate your roads. I know myself that these two are not enough for me and I will be making the other eight variants to add to my motor pool. Next time, I'll take a look at the taxi variants of this wonderful model.

Sunday 28 March 2010

Wargames Factory Zombies 01

Anyone looking for cheap 28mm scale zombie miniatures to flesh out their horde should seriously consider this offering from Wargames Factory, an American company, who specialises in cheap plastic wargaming figures. Given how popular zombies are at the moment I was not surprised to see this set released. I held off buying them for a long time. My plan was to wait until they released the female zombies set and purchase them both together. However, when Phil, one of my blog followers, sent me a few sampler figures my resolve disintegrated and I promptly bought a set last November. These are multi-part models. You get four sprues per pack and each sprue has enough parts to make six zombies. I'll air my opinions of them at the end of the review. For now, let's look at the figures.
The two photos above show six zeds that I created. I mention this because the following photos show zombies in poses and colour schemes that I copied from the Wargames Factory website. At far left is a zombie medic/scientist, whom I painted as an African American to distinguish him from the other doctor/scientist that I made. This is the only figure whose legs and torso come as a single piece, which given his long coat makes sense. Every figure has his left arm moulded to his torso, but the right arms are separate and you have a choice of eight to choose from. Their are nine separate heads, so you have loads of options for variety. This particular zombie has had his throat ripped open.
Next in line is a zed dressed in combat pants, heavy boots and a leather waistcoat. I see him as a street gang member who came to a sticky end. He has been shot between the shoulder blades and there is a large exit wound in his throat. I made the exit wound out of modelling putty. He has also been bitten in both arms.
I did a bit of sculpting and converting on the next zombie in line - the dude in the light blue shirt and blue shorts. His right arm was one of the short-sleeved options, which did not match his long-sleeved left arm. No matter. Because his right arm was horribly chewed up (so badly that you can see bone showing through the gore) I added a small amount of modelling putty to make his right sleeve appear torn and ripped. I also bulked out his hair with modelling putty to make it longer and bulkier. The conversion I did was to cut off the foot in the lower leg he's holding in his left hand and replace it with a spare hand. Now he's holding a lower arm and hand. A dead simple conversion that anyone could do if you don't want lots of zeds holding lower legs.
The fourth figure from the left is my fat slob zombie, Wayne. The torso has a noticable paunch to it. I glued his right arm tight to his body to mirror his left arm, which has been slightly altered so that it is closer to his body. He has a diagonal cut to his right breast that runs to his left collarbone, as well as wounds to his upper right arm, lower back and the back of his right leg.
The zombie in the orange shirt is my version of a shop assistant. That's why I painted a name tag on him just above his left breast pocket. He has an orange shirt because of an unfortunate incident I had in a local Games Workshop store. I went in to buy a pot of Citadel Blazing Orange paint for the simple reason that I'd almost ran out of it. The shop assistant asked what I was painting (why do they always do that?). I replied, zombies. "Oh!" he exclaimed, "I've never heard of zombies being painted orange before!" How stupid are GW staff? No don't answer - we all know they don't get hired for having a high IQ. I could not believe how he could A) assume I was going to use the paint on my zombies just because I said I was painting zombies (couldn't I have another reason for buying it?) and B) that I would be using it for their flesh tones! What a muppet! So at least one of my zombies had to have an item of orange clothing. This bald-headed zed has had a bite taken out of his right check, been shot in the back and has lost a great deal of flesh from his lower right leg. His left foot was bare but I added a shoe to it out of modelling putty.
The zombie at the far right of the photo is my attempt at making a crawler. I used the bare-chested torso as the basis for the sculpt. I repositioned his left hand so that it lay flat on the ground to support his weight. His right arm is stretched out, grasping at someone. His entrails surrounding his lower torso were, of course, made out of modelling putty. It was another easy conversion. The fun part was painting his entrails. 
As I mentioned earlier, I took my inspiration for these six figures from the Wargames Factory website. I must admit that the twelve figures that they were showcasing are painted to the very highest standard by Andrew Taylor. However, having just visited the website, I note with sadness that these six are no longer up for view. I'm glad I saved the pics of them when I did! I have used a very similar paint scheme on my own figures but my execution is not to the same standard. Don't get me wrong, I'm happy with the way that I paint. I paint my figures for use on the gaming table not for winning competitions or being stuck in a display cabinet.
I won't dwell too long on each figure shown in the two photos above.
From left to right we begin with the first of two zombies wearing short trousers. Next up is a bald-headed and bare-footed zed carrying a severed lower leg. To his left is a zed in camouflage pants and black vest (some sort of military type?). Then comes the second doctor/scientist of the horde. Note the bearded head. The zombie dressed all in blue could have been a cop or more likely, a security guard. Finally, is the second of the zeds wearing shorts in this particular batch. He is naked from the waist up and wears a cool pair of sunglasses.
The poses and colour schemes for these final six zombies were also copied directly from those that appear on the Wargames Factory website. These are the six figures painted by Andrew Taylor that are currently on the WF website. Once again, I'll just briefly describe each figure in the two photos above. At far left is another possible streetgang member. Next to him is a rare zombie wearing glasses. Nice to have that option! Next up are a pair of zeds dressed in short trousers. The zombie wearing nothing more that his pyjama trousers is quite cool. I like him just because he stands out from the crowd. And finally, I love the fact that the zed in the long coat looks like he's stepped out of an old hardware shop. Just ask him if he sells fork handles! (Fans of The Two Ronnies will get that joke straight away.)
You can visit the Wargames Factory website here at- http://www.wargamesfactory.com/_product_16676/Zombie_Horde A set of 24 zombies costs $17.95 and additional sprues can be bought for $5.00 per sprue. Instead of purchasing them direct I searched the Interweb for a UK-based retailer and found one at modelsforsale.com where they cost me just £11.57. That works out at less than 50p per figure, which really is terrific value. With so many possible poses you can build a large zombie horde in no time at all.
On the whole, I like these figures. I've made and painted 18 out of the 24. I'm holding the rest back for possible conversions. They go together very well and scale-wise they will fit in well with most other 28mm scale zombie miniatures. However, I do have a few niggles with them, but nothing major. First up, surface detail could be stronger. It takes a good paintjob to make these chaps come to life. Be aware, if you slap your paint on too thickly you'll obscure the detail totally! Second up, I wish the left arms were separate from the torsos to give even more options for poses. Yes, I know that being plastic, it is easy enough to cut the left arms off with a sharp craftknife but I'd still have liked to have seen them with separate left arms. Note that the figures come with integral bases but I reckon that most people will want to rebase them. I stuck mine onto 25mm diameter slottabases so that they fit in with my other figures. Now I'm eagerly awaiting the release of their female zombies. I'll be buying them as soon as they go on sale.

Wednesday 24 March 2010

WWG Flat-bed and Garbage Trucks

This week's WWG vehicle review showcases the flat-bed truck and garbage truck from the Bits of Mayhem set. After I had made the single-decker bus (reviewed last week) I wanted to make something that was a bit more challenging. These two vehicles fit the bill perfectly.
You can see that a lot of their components (cab, chassis and wheels) are common to both vehicles. I cut the section with the front engine grille and headlights out and glued it to a strip of mounting card, which I then glued in place to the piece of mounting card that I used to reinforce the front of the cab. This just makes it stand out a tad and you can see what I mean if you look at the photo of the garbage truck below.
Probably the hardest parts of the models to make were the fuel tanks and smoke stacks. Because they are cylindrical in shape it is impossible to reinforce them with mounting card. Mounting card is simply too thick to bend. So, I reinforced them with thin card, which I bought from an art suppliers. The instructions for these models state that the smoke stacks are optional, but to be honest, I couldn't imagine the trucks without them in place.
You can see from the photo above just how thick the railing is on the sides of the flatbed truck. That is because it is reinforced with two layers of mounting card. One layer would probably have done but I decided not to take any chances and went for ultra safety. Believe me, there is no give at all in that fence - it is solid! It is hard to see because my photo is too dark, but the garbage in the back of the garbage truck is just printed onto a curved piece of card, which is not glued in place. When I get time, I'd like to replace it with 3-D garbage made out of modelling putty. What is there looks fair enough for most uses but a little voice keeps on nagging me, saying you didn't go the extra mile this time, did you? Conscience can be a right swine!
These two vehicles are further proof that WWG are second to none in the field of papercraft modelling. Once again, I say just look at the texturing on both trucks - simply superb. As I mentioned in my intro, these were a bit of a challenge to make and if you're new to this hobby I'd recommend making something a lot simpler (like the single-decker bus) for your first build. On the other hand, if you don't mind putting in a bit of time and effort, you'll be rewarded with two very fine vehicles.
I haven't had call to use the garbage truck in any of my games yet but the flat-bed truck made a notable appearance in my St. Trinian's and the Living Dead battle report when the hellcats used it to escape from the zombie horde. See http://vampifansworldoftheundead.blogspot.com/2009/06/st-trinians-and-living-dead.html

Sunday 21 March 2010

Vampifan's Views 05 Happy 1st Birthday

It's celebration time! In fact it's double celebration time. This is my 100th post for my blog and the site is now one year old. Yaaaaay! One year on and I am still amazed at how successful and popular my blog has become. To everyone who has popped in to view it, many thanks indeed. To those who have gone a step further and become a follower, you have my eternal gratitude. And finally, a huge thank you to everyone who has left a comment, good or bad. Thankfully, the overwhelming majority of comments have been very favourable. As I type this, my number of followers stands at 48 and the hit counter is hovering just below the 30,000 mark, both of which I think are incredible achievements.
So what can you expect to see in the near future and what am I doing at present? The figure reviews and World Works Games reviews will continue for a long time to come. I've recently photographed a lot more of my WWG vehicles. Upcoming figure reviews will include zombies from Black Hat, Black Orc, Mega Miniatures and Wargames Factory, as well as vampires and ghosts from Horrorclix. I am currently painting the complete range of Mega Miniatures zombies, which is quite a task, as there are about 50 zeds in the range. I was put off from buying these for such a long time as I did not like the look of them but my good friend, Rogzombie, persuaded me to think again and I'm very glad he did. They are nowhere near as bad as I thought and their zombie children are absolute gems. I'm making more WWG vehicles but I plan on making a new building very soon. It could be the chapel from the Wildwood Grove set or something else entirely. I have a hankering for starting something massive like the Mayhem Police Station.
It has been a poor year so far, for horror films at the cinema but a lot better for horror film DVD releases. I've just ordered George Romero's new zombie film, Survival of the Dead from Amazon and I'm looking forward to watching it despite its mixed reviews from the press. I've also ordered the DVD of Zombieland and I am so looking forward to watching it again and catching up with the extras. I've heard that the film commentary is well worth listening to. Other zombie DVDs that I've seen recently and thoroughly enjoyed were Colin (remarkable film, considering its meagre budget), Doghouse (similar to but far better than Lesbian Vampire Killers), Quarantine (very good remake of Rec, but the original is only just better) and Zombie Strippers (okay, it was crap... but it was enjoyable crap with some good death scenes).
Bookwise, I've finished reading the complete set of Sookie Stackhouse novels by Charlaine Harris that I got at Christmas. They were just a superb set of books and I see that series 2 of True Blood is being released in the UK on May 17th. Yippee, I don't have that long to wait. There is never a dull moment in Sookie's life. I've just read the first two novels in the Jaz Parks series by Jennifer Rardin. Jaz, or Jasmine to give her her full name, is a CIA assassin who partners a vampire assassin called Vayl. The novels have a similar sense of fun to the Sookie Stackhouse novels. I've just started reading book three of the action-packed series. I recently visited one of my local Waterstone's bookstores after a long absence. I tend to buy all of my books online, especially from Amazon. What surprised me greatly was the amount of vampire novels that are now on sale. A lot of them seem to be aimed at a female audience, so it would seem that Twilight has a lot to answer for. Personally, I think it's a good thing. If vampires are now the flavour of the month that's cool by me.
I would love to add more battle reports, especially of All Things Zombie, to my blog, but sadly that isn't going to happen in the near future. My father's confinement to home, following a serious knee injury has put a temporary hold on my gaming activities. Thankfully, he is on the mend but his recovery has been a long and slow process. Hopefully by the time summer comes around I'll be able get back into gaming in a big way. In the meantime, I'll carry on painting my miniatures and making more scenery for Mayhem City.
To all my viewers, once again I thank you for your support. Now, let's celebrate with a nice drop of claret and some finger food. I'll raise a toast to year one and hope you'll stick around for year two. Cheers, everyone!

Wednesday 17 March 2010

WWG Single Decker Bus

This week's WWG review reverts to my vehicle collection. This is the single-decker bus found in the Bits of Mayhem set. The red pick-up truck found in the Mayhem Armoury set and reviewed earlier this year was the first WWG vehicle that I made. This bus was the second.
Rather surprisingly, the default destination sign for the bus is "Out of Service." However, the model does come with four alternative signs - Main St, Unger St, Senior Rd and Lyon St. I chose Main St for the destination of my bus, as it is such a generic name. Unger, Senior and Lyon are named after three of the WWG designers - Denny Unger, Paul Senior and Matt Lyon. I don't blame them for adding their names to the list of choices. I'd have done the same myself!
As you can see from this side view photo, the bus is very long. Indeed, it is the longest WWG vehicle to date, unless you count the tractors and trailers from Mayhem Industrial as one item, which I don't. Take a close look at the weathering on the bus. This is one of the things that I love about WWG - the texturing on their models is second to none!
As well as giving you a variety of options for the destination sign, the model also comes with an additional three number plates to the one shown. This is very useful if you plan on building a fleet of buses and is something that I wish WWG offered with all of their vehicle models.
My one piece of superdetailing that I added was that I cut out a recess in the mounting card backing that I reinforced my model with for the three destination signs (front, left and right sides). This really is the easiest model to make out of all of the WWG vehicles. It is, in essence, a box on wheels, with the wheels being the hardest parts to make, although they are not that difficult to make.
After I've printed the wheels out, I cut them out, removing those fiddly triangular glue tabs. The four circular wheels are stuck to thin card, as is the wheel tread sections. I reinforce the two sides of the semi-circular wheels with mounting card, cut out with a big pair of scissors rather than a craft knife. Depending on the thickness of the tyre. I either reinforce it further with a small piece of foamboard or two small pieces of foamboard. This makes the half-wheels a solid item. I glue them in place then, when dry, I glue the circular wheels in place. A handy tip is to edge the circular wheels before gluing them to the model. The thickness of the card that I use to reinforce them means that they protrude ever so slightly from the sides of the model. I find this perfectly acceptable as it helps give the wheels definition. Another tip that I'd like to pass on is don't be too anal about getting a perfect curve when cutting out the mounting card or foamboard to reinforce your wheels with. I usually make do with five straight cuts for a semi-circular wheel.

Sunday 14 March 2010

Studio Miniatures Survivors 01

As well as producing what are, in my opinion, the finest 28mm scale zombies on the market, Studio Miniatures also make an assortment of survivors. All of their survivor figures are based on famous heroes and heroines from the movies and most of them are easy enough to recognise. However, due to copyright restrictions, Studio have given all their survivors new names. I can't blame them for that. Shamefully, I have had these for a long time (especially the first two) but have only recently got round to painting them. Oh well, better late than never.
First up is Mia, the only female in the group, and she ought to be instantly recognisable to any reader of this blog. She is, of course, based on Milla Jovovich's kick-ass survivor, Alice, from the Resident Evil trilogy of films. I'm a huge fan of the Resident Evil films and I adore Alice. The figure of Mia represents Alice as she appeared in Resident Evil: Extinction, the third film. It was the only film in which she used a pair of kukri knives, which is what the figure is wielding. Some folk have criticised the figure for being too flat, but I don't accept that. I think it is an excellent sculpt by Chris Jackson, who isn't Studio's regular sculptor, and he has achieved a superb likeness of she who is rightly deified as Saint Milla on the Post Apoc forum.
Next in line is Cole, another Chris Jackson sculpt, and again, he should be immediately recognisable to my blog readers. 'Tis none other than the indominatable Ash from The Evil Dead films. You have a choice with this figure regarding his right hand. Ash had to chop his hand off in Evil Dead 2 and you can have the figure with a bandaged stump, or do what Ash did later on in the film, and attach a chainsaw to the stump. For me, it was a no-brainer, I had to glue the chainsaw in place. Once again, this figure has been criticised for being too flat and once again, I totally disagree. The pose may be flat but a close inspection of the figure reveals no faults with the standard of sculpting. Other versions of Ash (and indeed, Alice) are available but I'm happy to use these two as my definitive versions of the movie characters.
I can fully understand why Studio chose to make not-Alice and not-Ash for their first two survivors as both were noted for slaying zombies in heroic numbers. But the next two survivors surprised me a great deal. In the centre of the photo is Willy, or as we all know him, Detective John McClane, the hard-boiled cop from the Die Hard series of films. Willy represents Bruce Willis's hero from the first Die Hard movie. It's easy to tell when you look at his feet which are bare apart from a few strips of bandages wrapped around them. Who can forget the scene when he has to walk bare-footed through a room full of broken glass? This figure, like the vast majority of Studio figures was sculpted by Daniel Parcy, a man with an abundance of talent. The figure is beautifully animated and armed with a 9mm Heckler and Koch MP5 sub-machine gun. If I had one criticism to make it is that the head is slightly too large for the body, which was a failing for the Scrubs zombies. But it doesn't bother me too much as it is great likeness of Bruce Willis.
The other survivor that surprised me was this one, called Dutch, aka Arnold Schwarzenegger as The Terminator. This could be the good Terminator sent back in the second and third films, which would indeed, make him a heroic survivor, but I don't think he is. I think he's the evil Terminator from the original film. Why? Just look at the weapons he's carrying - a Franchi SPAS 12 shotgun and a 5.56mm Ruger assault rifle, both of which he used when he went on the rampage in the police station and just about massacred everyone he found. The pose as well, is indicative of that particular scene. This is the Terminator in full Angel of Death mode! Once again, hats off to Dan for a faultless sculpt, which incidentally comes in two parts. The right hand holding the shotgun is a separate piece.
The final figure out of the group is known as Miguel, and is surely the least recognisable, although I guessed his true identity as soon as I saw him. He is based on John Leguizamo's character Cholo DeMora from George A. Romero's Land of the Dead film. Again, I find this an odd choice for a survivor. For starters, Cholo does not make it to the end of the film, although he is one of the major players. Secondly, I'd have preferred to see figures of the heroes who do survive the film, Riley Denbo, Charlie Houk, Slack, Pillsbury and Pretty Boy. None of which detracts from another fine piece of sculpting from Dan. Miguel/Cholo's weapon is rather unusual - it is a spear gun. It may be a single shot weapon but it is silent and when it comes to shooting zombies that is a major factor to take into consideration.
Each figure costs £3.99 for the white metal version and £4.99 for the resin version. I really like them all and painting them was a pleasant change from all the zombies I'm churning out. I do see one problem with these figures and it is this - how could you use them in a game with the names Studio have given them and use them as generic survivors without yearning to use them as their movie counterparts? Mia or Alice? Cole or Ash? Willy or John? Dutch or Terminator? Miguel or Cholo? Who would you rather play? Yep, same as me!

Wednesday 10 March 2010

WWG 7-Eleven Store

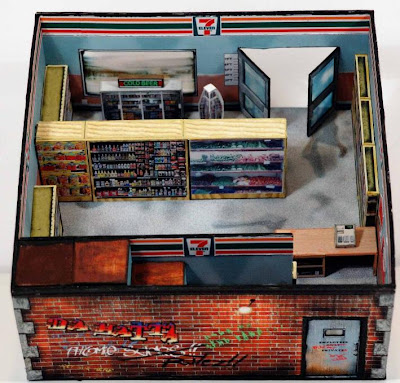
One of the buildings that I was desperate to include in my Mayhem City collecetion was a convenience store. Every city, town or village should have one. Now World Works Games don't make one per se for their contemporary setting but Joe Spears (aka LuckyJoe) submitted an addition to the Mayhem garage as a kitbash. It was a single storey shop and it was this that formed the basis for my convenience store. The first thing I did was replace the Mayhem Petroleum Corporation logo with that of the 7-Eleven logo. There are no 7-Eleven stores in England, but I know that they are very popular in America, so I Googled their logo and a few advertising posters and I was ready to begin my latest project.
I wanted this to be a two-storey building, with the store on the ground floor and the owner's living quarters above. The exterior walls for the store came from LuckyJoe's kitbash, whilst those of the upper floor came from the Mayhem Armoury set.
I also wanted the building to have a sloped roof. Again, I was fortunate that there was a kitbash for sloped roofs. It contains two types - a shallow slope and a steeper slope. I chose the steeper slope for this building.
The roof kitbash comes with a choice of two roofs, two different side walls and two front and back walls. I cut about a half an inch off the bottom of the four walls as I did not want them to rise so far above the upper floor.
This lower side wall comes from the Mayhem Armoury set and replaces the one that came with the kitbash. The problem with the "official" wall was that it was covered in writing proclaiming the shop to be the property of the Mayhem Petroleum Corporation, which would have looked odd on the side of a 7-Eleven store. So it had to be replaced.
Here we see an overhead view of the ground floor. The stairs at the back are hidden by an interior wall and they come from the Mayhem Armoury set, with the risers repainted to blend in with the wall colouring. The floor tile comes from the Optional Elements folder of the Mayhem Armoury set.
The two shelves against the rear wall come from the pet store in the Mayhem Mega Mall set. The three shelves in the centre of the floor are from LuckyJoe's kitbash. Sadly room restrictions meant that I had to cut one of them in half just so I could fit them in. Also, note that these come with sloped sides as they are based on the ammo shelf from Mayhem Armoury. I got rid of the slopes so that they took up less floor space. Mine are only half an inch wide at the base, instead of an inch.
The three shelves next to the front door at the top left of the photo above also came from the pet store in the Mayhem Mega Mall set. The posters on the wall by the cash counter are ones that I downloaded from Google images of 7-Eleven. I'd like to draw your attention to the rack of sunglasses next to the front door. In LuckyJoe's kitbash, this was a simple box shape with four long sides and a square top and bottom. I liked the idea of a stand for sunglasses but not the shape, There was too much white space on display. So I divided each side into three equal parts and made reverse folds for the centre two lines I'd pencilled in. This gave me a box shape with arms radiating from each corner. I cut as much white as I could from the four arms to give them the curved shape you see above. I stuck the whole structure onto a small white plastic counter. I'm immensely proud of that conversion and it's my favourite piece of furniture in this project.
The liquour cabinet by the front window is part of LuckyJoe's kitbash. I printed the neon sign that sits on top of it out twice so that it could be read from the front and the back. The cash counter has been converted from the one in the Mayhem Armoury set. I got rid of the drawers and made it a simple rectangular shape instead of an L-shape. The cash till that sits on top of it is from the pet store in the Mayhem Mega Mall set. What I particularly love about this particular cash counter is the sawn-off shotgun hidden underneath it! The owner of a place that is such a magnet to hold-up criminals needs some sort of protection.
Once again, the pet store from Mayhem Mega Mall provides me with another two shelf units, as seen against the far wall in the photo above. You can also see more clearly how the sides of the centre shelves are straight not sloped.
And so we move upstairs to where the storeowner lives. I've divided this floor into three rooms - bedroom, bathroom and living room/kitchen. The wooden floor tile comes from the Optional Elements folder of the Mayhem Armoury set. The blue carpet in the bedroom comes from the Mayhem Police set, whilst the cork tiled floor in the bathroom is a free downloaded from Jim's Dollhouse Minis.
The railing next to the stairwell is from the Urban Grind set, and fits in very well. The table with the chess board is from the Fantasy Interiors set - Pubs and Inns. The chairs either side of the table are from the Shellendrak Manor set. In the bedroom I added three small boxes or crates from from the Ebbles Ambient Elements set - Storeroom. In the bathroom, the bath also comes from the Shellendrak Manor set, such a useful source for furniture! Note the air-conditioning unit sticking out of the window to the lower right of the photo. That is part of the Mayhem Armoury set.
The wallpaper in the bathroom is another free download from Jim's Dollhouse Minis website. I made the two white doors in the interior wall myself. Against the far wall of the bedroom is a scratchbuilt cupboard and a bookcase from the Mayhem Police set. Moving back to the living room, I added a washing machine underneath the wall painting. That also came from Jim's Dollhouse Minis website. Next to it is a wall cabinet from the Mayhem Police set that I'm using as a stand for the TV set that comes from Mayhem Armoury. Once again, I have changed the picture on the screen. It shows a scantily-clad young lady on a motorbike. (Cue lots of males left-clicking to get a closer look!)
Either side of the A/C unit are kitchen furniture items from the Mayhem Armoury set - a fridge to the left and an oven and sink to the right. The single bed in the bedroom can be found in the Mayhem Police set as part of the police cells furniture. I guess the owner is single, perhaps widowed.
Against the far wall in the above photo are a drinks cabinet (from the Pubs and Inns set) and a battered leather settee (from the Mayhem Armoury set). The two paintings hanging on the wall above the settee came from the office furnishings of the Mayhem Industrial set. Finally, the toilet in the bathroom is from the Mayhem Police set. I would dearly have loved to have added a wash basin to the bathroom but there just wasn't enough room. Bummer! The box in the bedroom is one of the three that I mentioned earlier.
The next time I run an ATZ battle report, this building will surely feature in it. It was a lot of fun to make and it took me a couple of months to complete. I was in two minds about making the upper floor the owner's living quarters. My other option was to make it into a large storeroom for keeping excess stock for the store below. It's an idea I'll very carefully consider next time I make a two-storey shop.

Sunday 7 March 2010

Studio Miniatures Zombies 07 - Xmas Nightmare

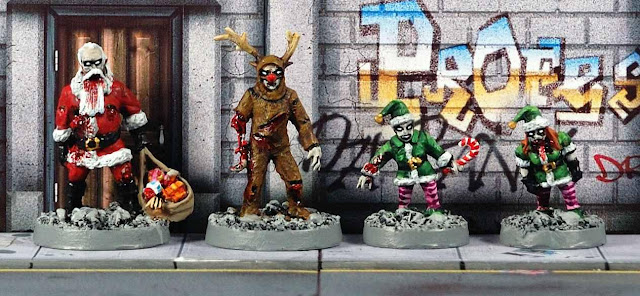
It just seems wrong to be reviewing Studio Miniatures' A Christmas Nightmare set in March but such is life! I'm sure that the good folks at Studio Minis would have liked to have released these in time for Christmas 2009 but they weren't released until mid-January 2010. Unlike their other boxed sets of 28mm scale zombies, this set only contains four figures, not eight. Without further ado, let's have a closer look at them.
At the far left of the group is zombie Santa. This guy looks evil! The way his eyes are hooded in a threatening grimace suggests pure menace. I like how his beard and moustache are clearly false - you can see a thin piece of string or elastic holding them in place if you look very closely (maybe not too clear from my front-on photo but from the side you can see what I mean). Zombie Santa is suffering from quite a few wounds, the most serious of which is his stomach wound. His intestines are just starting to wriggle free. He has been shot in the back, bitten in the left leg and holed in both arms. As per the website photo of him, I have smeared his beard with blood as it dribbles from his mouth. His sack contains more than just nicely gift-wrapped presents - there is a child's severed foot and hand in there as well!
Next up is zombie Rudolph the Red-nosed Reindeer, or to be more precise, a zombie in a Rudolph costume. He wears a false nose, just like Santa's false beard, which is held in place by string or elastic. Check out the wound on his right arm - it is brilliantly done! The flesh has been totally chewed away from his lower arm, leaving just the bone showing through. The hand dangles uselessly. In addition, he has two vicious cuts to his stomach as well as numerous holes in his legs and left arm. His antlers have been damaged with a number of points having been snapped off. This guy has been in quite a fight and come off second best!
At first I thought that the two little Santa's helpers could have been children due to their size but a closer look at the female shows she has a fine pair of breasts on her. She's no kid, she's a fully grown woman, which means she must be a dwarf. In all likelihood, so too is the male. So, we have zombie dwarves. Ho-ho-ho! The male holds a striped lollipop in his left hand. A large bite wound is prominent on his right arm and he appears to have been shot in the back. The female is dressed similarly to her colleague but note that she has short sleeves on her coat and the shoulders have been puffed up. She too, sports a wound to her left shoulder-blade but that is her only wound. I smeared blood around her mouth, chin and collar to show she has fed recently.
These are absolutely delightful figures and as far as I'm aware, totally unique. When I was recently looking for a zombie Santa the closest I could find was the Foundry skeletal Santa, so full marks to Studio for filling in the gap. I'd just like to emphasise on behalf of Studio that these are NOT limited edition figures. If you want the metal versions of A Christmas Nightmare set, it will cost you £11.99, whilst the resin versions cost £16.99. Studio Miniatures continues to go from strength to strength, producing outstanding zombie figures, and these come with my highest recommendation.

Wednesday 3 March 2010

WWG Basketball Court

I thought that I had reviewed all of my WWG buildings and scenery that I've made so far but I was wrong. Somehow, this piece, my Mayhem City Basketball Court, had been overlooked. So I'm going to take a short break from reviewing my WWG vehicles to show off this piece.
The two ground tiles come from the Mayhem Marina set. I prefered them to the concrete ground tiles in the Bits of Mayhem set. I drew the basketball grid onto the tiles with a pencil, ruler and compass, then I painted over my lines with Citadel Skull White acrylic paint. I did it freehand and was not too bothered by the shaky, uneven effect that I've ended up with. I figured the lines were painted on either by the youths who use the court or by a council worker who clearly does not take pride in his work. It adds flavour to the fact that I see this as part of the slum district of Mayhem City, a place where street gangs hang out and decent minded people steer well clear of.
Note the two hoops on the basketball support stanchions. They and the stanchions come from the Bits of Mayhem set. The hoops that you get in the set are basically drums, with the netting around the sides and a black "lid" for the top and bottom. This seemed like an odd way of making them to me. So, I printed out four sets of hoops instead of two. I cut off the top and bottom "lids" and stuck two side sections back to back to form a cylinder. You must admit, it is a more logical solution and it surely looks better. Now, you actually can drop a ball (or a zombie's head!) all the way through the hoops.
The fences also come from the Bits of Mayhem set but not in this format. I cut out all of the chainlink fence sections, just keeping the framework. I replaced the chainlink with pieces cut out from a sheet of thin aluminium wire mesh, which I ordered from Antenociti's Workshop, a UK-based supplier of wargaming terrain. A 10"x8" sheet cost £1.80 and I ordered two. Other websites and stores sell it and what I like about is that it is very light and very easy to cut. Indeed, it can be cut with a pair of scissors. I reinforced the front and back of the framework with thin strips of mounting card and sandwiched the mesh in between. I used thin strips of card to hide the joins along the tops of the framework and along some of the sides (the corners and both sides of the entrance). Using a double thickness of mounting card to reinforce the framework not only gave it considerable strength but made it easier to glue the fences to the ground tiles.
In the lower left hand corner of the above picture is a drinks dispenser from the Bits of Mayhem set. I chose the one with the shattered glass front, as I reckoned it would be the first thing to get vandalised by the unruly youths who hang out here.
The six orange seats came from the Mayhem Rail set. They help to hold the framework in place, as did the drinks dispenser described above. I used those same seats in my Mayhem Park build and I find them a very useful prop for outdoor seating.
The only other prop in this build that I haven't mentioned so far is the litter bin found just next to the entrance. That too, came from the Bits of Mayhem set.
Let me give you some advice if you fancy having a go at this model. You could build it on just one ground tile, but if you do, just add one basketball hoop. Also, when it comes to reinforcing the framework, I found it far easier to cut out thin strips of mounting card and gluing each one in place rather gluing the framework to a sheet of mounting card and cutting out the bits where the mesh goes. That's too wasteful of mounting card. I made all of the upright sections first, then added the top and bottom crossbeams. Note that for the two short end pieces of framework you can omit reinforcing the outer two uprights. The thickness of the long side pieces will be more than adequate to make up for their omission.
This is a useful piece of scenery to use in zombie apocalypse games like All Things Zombie. It can be a cage for any zombie who ends up inside it. If your survivor character is outside next to either of the short sides or the long side opposite the entrance they are effectively safe from any zombie stuck on the other side. Most zombies lack the intelligence to climb over the fence or turn around and head out of the entrance. Sometimes the terrain can be your best friend!