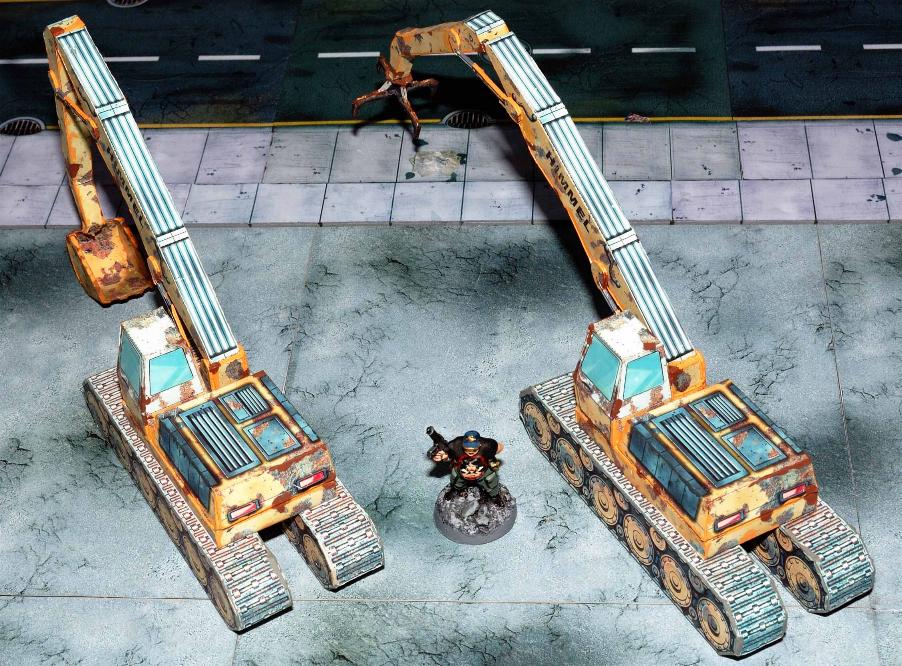
As well as making card buildings, I like to make card vehicles. Now, I may have fell out of favour with World Works Games when it comes to buildings (basically, I'm not a fan of their new TLX buildings) but as far as model vehicles go, WWG are still number one in my opinion. Here are my two latest models and these came from the old Mayhem Junkyard set - a digger and a grabber.
When I decided to make these, my first thought was, "should I make the digger or the grabber?" What an idiot! The obvious answer was to make both! To the left is the digger with its bucket scoop at the end of its arm. To the right is the grabber with its mechanical claw at the end its arm.
Regarding the construction of these two models, the tracks and body were very easy to make. The arms and their attachments were much, much harder to build, especially as I reinforce my models with mounting card. Actually, despite the extra effort, it has paid dividends. I can just imagine how flimsy the arms and attachments would be if I hadn't reinforced them. I'm comforted by the fact that these will stand up to a lot of handling when I'm gaming.
This side view shows the vehicle with the digger attachment. The two small, slender hydraulic arms on either side of the main arms were reinforced with thin card, but when glued back to back are quite thick and robust. There is very little space to work with for attaching the bucket to the end of the arm, so I glued it in place with a dab of superglue to get a really strong bond.
I normally print my vehicles onto satin photo paper for a semi-gloss look. For these, however, I printed them onto my standard matte photo paper. It reinforces the fact that they have not just rolled out of a factory but are working vehicles that will get dirty very quickly. One thing I did do, which isn't too clear from my photos was to gloss varnish the windows.
Here we have the side view of the grabber. The grabber itself was reinforced with thin card and it was the most fiddly part of the model to cut out and glue together. One thing that I always do with any card model is to "edge" them. Edging is colouring in the white edges of your model so that they blend in with the rest of the model. Most tutorials suggest using felt tip markers to edge. I prefer to use acrylic paints. This means you have to take extra care and a steady hand is a must. However, on the plus side, it gives me a greater range of colours to play with and I can more accurately match up the colours required.
If these were die-cast models, you'd be able to move the arms up and down. Unfortunately, that is not an option with these, so the arms have to be glued into one position only.The hydraulic joint between the bend in the two arms gives you some variation in how the arms can be positioned.
Keen-eyed viewers will have seen the digger version of this pair making an appearance in my "Assault on Precinct 13" scenario, where it was no more than a background prop. These would both make fine zombie fighting tools, with a number of options for dispatching zeds. I'm very happy with how they have turned out, but I must stress that these are not suitable models for the beginner.
NOTE: the first five photos have been edited to show the bucket attachement to the digger fitted the correct way round - facing the cab.


Those are really great and especially grabber looks dangerous. I can only imagine how much work that grabber's arm took!
ReplyDeleteIs there any specific reason for the position of the diggers "basket"? I haven't yet seen a vehicle having it in this position, but then again, this makes it a perfect vehicle for assault on higher positions, as it could lift someone up there, hehe!
Thanks, Mathyoo. The reason for the digger's bucket (it's called a bucket, not a basket, by the way) is simple. That is the position it was meant to be glued in. I simply followed the instructions without any deviation. Yes, you are right, it could be used to raise a person to higher ground, or lower them.
DeleteApologies, Mathyoo, I now see what you meant about the bucket. Also, rechecking the instructions, it only shows how to fit the claws. The bucket was left off the instructional photo and I obviously screwed up when I glued it in place. Sigh, how embarrassing!
DeleteThe bucket, of course! I was close with the basket :D. Thanks!
DeleteLooking really good mate!
ReplyDeleteI know nothing of diggers, I thought the shovel was supposed to be put on the other way.
Amazing that this is card!! Again well done Bryan!!
Oh, for Christ's sake!!!!!!!!!!!!!
DeleteYou're fecking right, I've glued the bucket back to front!
Slapped wrist for me and time to do some corrective surgery!
Looking good Bryan, I wouldn't worry unduly about the bucket, it's obviously a survivor's modification !
ReplyDeleteGood response, Joe! Thanks for the save, my friend. However, knowing I got it wrong I just had to change it. Thankfully, being made of card it was real easy to cut off the bucket and glue it the proper way round. At the same time, I have repositioned the claw arm on the grabber. I'll show new photos of them in my Monthly Musings post on Wednesday.
DeleteThose are really great vehicles! I didn't even notice the whole bucket thing until I read the comments lol Just wondering, what is it you don't like about World Works Games buildings? I don't think I have seen their buildings :/
ReplyDeleteLet me clarify about my dislike of the WWG buildings. It is only their TLX range of buildings that I don't like. TLX stands for Terrain Linx. These models are designed to be taken apart so that they can be stored flat. This is fine if you have limited space. I prefer my buildings not to be detachable. The method of construction of a tLX building is fiddly and very labour intensive and time consuming, especially with the construction of the anchors that the walls attach to. I should point out that I do like the new TLX floor/ground tiles and I have made a lot of them. Also, I love WWG's old style buildings, which were meant to be permanent builds.
DeleteToo damn good I've always struggled with paper vehicles.
ReplyDeleteI've had years of practice of making card buildings, so it is second nature to me.
DeleteVery nice Bryan, Alaskan Gold Rush just reached your city.
ReplyDeleteHee, hee, the only place you'll find any gold in Mayhem City is in the bank vault!
DeleteWow they look superb its really hard to believe these are card especially the grabber arm one.
ReplyDeleteThanks, Simon. That's a really nice compliment.
DeleteIn general I agree with you that the Worldworks vehicles are the best and you've done an excellent job on these, as always. But there's something about the excavator/grabber kit that doesn't look right to me (and I'm not referring to your unfortunate slip in construction). Maybe the tracks are too long, or maybe they're too close together? I'm really not sure about this one.
ReplyDeleteI'm unsure how to respond to this, Colgar6. They look fine to me, but then again, I know very little about real life construction vehicles... otherwise I wouldn't have stuck the bucket on back to front.
DeleteAw, don't worry about me. If you and everyone else like them then that's good enough, right?!
DeleteI know what bothers you, Colgar. The quite typical CAT Digger has shorter tracks and they are further away from each other to allow for a much more stable standing when excavating at another angle than is more to 90 degrees to the side rather than straight forward :)
DeleteBut maybe that's just how diggers look in Canada ;)
Wikipedia pic for reference:
http://upload.wikimedia.org/wikipedia/commons/thumb/d/d0/CAT_325_Raupenbagger.JPG/800px-CAT_325_Raupenbagger.JPG
Nice picture, Stefan, but it's a lot different to the WWG version.
DeleteThat's my point, Bryan. I kept looking around but can't find anything close to Matt's design. The ref pic is just an example of the ones I am used to and have been lucky enough to be allowed to drive once :D
DeleteIt displays the points mentioned above.
I did not get to build one of these yet, but I could imagine these were design choices to keep the excavator model from tipping over (long arm vs. fake counter-weight) and fit it on a normal WWG road.
Nice work putting them together, btw.
They look great Bryan, as vehicles go they are very detailed and look terrific, good job on the construction.
ReplyDeleteThanks, TE. There is a lot of detail on them.
DeleteWow, I never seen miniatures like these before, really nice.
ReplyDeleteThanks, Pixel.
DeleteWhile not a fan of card terrain (it would get broken at my club.... not deliberatly, but just in storage). Anyway I like these two beasts. I like the tatty worksite feel of the rust, mud and scratches.
ReplyDeleteAs for the Bucket.... F*ck it! Who really cares which way it's attached.
One of the things that WWG are renowned for are their textures. They're very realistic and in this instance, these vehisles look like they've seen some wear and tear. They're hardly factory fresh, are they?
DeleteAs for the bucket, it's been changed now. It would have bugged the hell out of me otherwise.
Hehe no worries! Your model and your rules! As Zabadak mentions...It could have been a modification by a group of survivors!
ReplyDeleteGold you say? In the bank....And you have two heavy duty vehicles right here...
And the police just had some major problems with an attack on the station..
Hmmm....Would be a shame to leave it in there to waste away.....
Johnny, I love your thinking! Now all I have to do is build a bank!
DeleteBank you say? Behind a sliding vault door right here... I love YOUR thinking!
ReplyDeleteYep, we're on the same wavelength, Carl. That is exactly what I was thinking!
DeleteI keep hoarding different paper vehicle files in various scales (hoping to rescale them in a second moment) but never had the courage to actually try to build one.... Looking the great work you do, I really think I should try.... :\
ReplyDeleteCiao.. :)
Go on, Gnotta, bite the bullet and have a go. Pick something easy to start off with - not these two, mind you!
DeleteSo wanted to see Big Sil running over to the digger in your last batrep and smash through the hordes of zombies around the police station :D
ReplyDeleteNow that would have been a sight to see, Stefan!
DeleteNow you know what to expect if you spot some heavy machinery on one of my boards in the future ;)
DeleteZombie squishing - a new sport brought to you by Stefan!
DeleteDamn fine work as alwayas Bryan! You should be proud of these machines!
ReplyDeleteI do have to ask though ... on the other side of the arms, does it read "Gott Im"? ;)
Sadly, no, Colin. It says Himmel on both sides, which is far more boring than your suggestion!
Delete