Wednesday 27 February 2013

Vampifan's Views 35 - Monthly Musings 19

Vampirella by Mike Deodato. Snakes don't bother her!
February has been a very busy month for me, especially with all of the card modelling I have done. I have been churning out new ground tiles to use in my ATZ-FFO campaign from Stoelzel's Undeveloped Real Estate set, which I told you about in my last Monthly Musings. I am going to do a full review of what I have made so far in the next couple of weeks. Suffice to say, I am very happy with my new ground tiles and I can't wait to use them in a batrep. Carl's new ground tiles are the best on the market and I highly recommend them.
Speaking of bat-reps, you will be pleased to hear that I will be continuing my ATZ-FFO campaign in March as Team Vampifan ventures out on its first foray into the suburb of Springvale since the outbreak began. Vampifan will be leading Angie, Big Sil and Gap for the first time in my new campaign. Expect a batrep around about the middle of the month.
In other news, Ryan, who was one of the very first followers of my blog, kindly informed me that there was a copy of the Zombicide board-game going for sale on e-Bay for just £60.00 and that all of the figures were painted. Seeing as the seller resided in the UK, I placed the first bid. I never expected to win the auction even though it still had one day to run. Sure enough, I didn't. Five other bidders popped up and it eventually sold for £85.00, which was way too much for me. To be honest, I wasn't bothered at losing out for two reasons. First up, the figures were not well painted and I'd have had to do a lot of work on them to bring them up to my standard.
At last I have a copy. It's been a long wait.
Secondly, Ryan also told me that Amazon UK were selling it. They were asking £68.99 for it, which I didn't think was too bad. They had a lot in stock so I placed an order last Friday and three days later, it arrived. Zombicide is a game that I have wanted to own ever since I first saw it promoted on Kickstarter last year. I deliberately held off from making a pledge for it as I didn't want to get hammered by the thieving bastards at the UK's Customs and Excises. I've been ripped off by them before and it leaves a nasty taste in the mouth, knowing you have to pay up. So I have bided my time until a UK retailer turned up. Thank you, Amazon! So I now have a brand new copy and I have another 71 figures (65 zombies and 6 survivors) to add to my unpainted plastic figures mountain. They are very nicely sculpted and seeing as they are made of hard plastic, they will paint up very well. What I most like about the game is that it caters for the solo gamer. Yay! Hopefully, I'll be able to find the time to play a few games this month, just to get the hang of the rules. Mind you, having read the rulebook, it does seem very easy to play. If you want to see what some of the zombies look like painted up check out Lord Siwoc's blog Brains and Guts here - http://lordsiwoc.blogspot.co.uk/2013/02/zombies-dumpster-diving-and-good-deal.html Johnny, I'll be copying your colour schemes for some of my zombies!
Earlier this month, I bought the 16 new supermarket zombies from Grekwood Miniatures, along with a pack of 25 deciduous trees. I have decided that I want more trees in my zombie campaign and more variety of trees. So Carl at Grekwood can expect more orders for trees from me, as he carries a nice variety of them and they are reasonably priced. Having used some of my old Games Workshop trees (now withdrawn from sale - why am I not surprised?!) in previous bat-reps I found that the biggest problem with using them was that they fell over far too easily. I got round this by using Blu-tac on their bases but this was a solution I was never happy with as there was always a risk that the Blu-tac would tear the ground tile when I tried to remove it. In fact, this happened on a few occasions. The Grekwood trees are on even smaller bases than the GW ones. My new solution is to stick them permanently to circular bases. To this end, I ordered a selection of varying diameter MDF bases from East Riding Miniatures. These range from 30mm to 80mm diameter. Next month I will glue all of my trees to these bases. I am hoping the large bases will prevent the trees from falling over if I even cough on them! Well, it'll make a change from painting miniature figures.
It looks like March is going to be a busy month for me!

Sunday 24 February 2013

Ultimate Zombie Feast DVD

It has been ages since I last did a film review. To be honest, my book, DVD and film reviews are not as popular as my figure or scenery reviews. No matter, they are a part of my blog and I have no intention of dropping them. This particular DVD, Ultimate Zombie Feast, warrants a mention because it is something different and ought to appeal to zombie lovers everywhere.
This is a rarity amongst DVDs - an anthology of short films. It comprises 16 films on two discs, ranging in length from 5 minutes to 64 minutes. As with all anthologies, some stories are better than others. There are a couple of stinkers but most of the films are good and a couple of them are outstanding. Here's a rundown of all 16 films along with my individual ratings.

DISC ONE
Zombeer (Netherlands 12 min) A very silly film about a brewery worker who falls into a vat of beer and turns into a flesh-eating zombie. Utter pants! 2/10
Zombies and Cigarettes (Spain 17 min) Set in a Spanish shopping mall this wasn't too bad but it loses marks for the ridiculous way that the zombie threat is vanquished. 5/10
Plague (UK 17 min) A very atmospheric and moody film about an Eastern bloc refugee who comes to England to find a better life just as the zombie apocalypse starts. Bleak and dark in tone. 8/10
Bitten (UK 6 min) A harrowing look at a woman's final minutes as an infected human before she turns into a zombie. 6/10
Arise (USA 18 min) A factory worker who predicts the zombie apocalypse tries to save his girlfriend and her daughter. It is full of over the top gore that made me smile. 7/10
Not Even Death (USA 5 min) A loving husband keeps his zombie wife chained up in his cellar. You can see how it's going to end a mile away. 6/10
Fear of the Living Dead (USA 16 min) A young woman is one of the few survivors of the apocalypse due to the fact that she is immune to zombie bites. She reluctantly teams up with a young man she finds holed up in his house. The ending is a total shock. My favourite film of this anthology. 10/10
Kidz (Canada 9 min) A very amateurish and cheap looking film about three children who have to learn to survive when their parents are killed at the start of a zombie outbreak. It won me over with its smart script and sting in the tail ending. The last line of the film had me laughing out loud. 7/10
The Book of Zombie (USA 64 min) Far and away the longest film in this set. The setting is a small town in Utah where a horde of zombie Mormons (yes, really!) go on the rampage. A small group of survivors take refuge in a bar. The special effects were very well done with a lot of gory deaths (human and zombie). Again, it has a good ending, although the story is ludicrous. 6/10

DISC TWO
Zombie Harvest (UK 11 min) Who'd have thought that a cow could be zombified when a zombie accidentally shoves his head up the cow's arse? You have to laugh! 6/10
The Skin of Your Teeth (USA 14 min) Four friends (three male and one female) are holed up in a farm in the middle of nowhere. It all goes horribly wrong when they are attacked by a horde of zombies who move faster than an Olympic sprinter. A very bleak story. I really do not like zombie sprinters but I did like this film. 8/10
Zomblies (UK 47 min) A terrific story set in the South West of England. A large wall has been erected to keep Devon and Cornwall quarantined from the rest of the UK. A squad of six elite soldiers are sent inside to gather intelligence on a new breed of zombie that have evolved - Ragers. This was full of action and very tense and gripping. Despite having yet more fast moving zombies, I enjoyed this film immensely. 9/10
It Came From the West (Denmark 16 min) A quirky film that uses puppets to tell its story. Set in the Wild West, this was very much played for laughs. I wasn't that impressed with it.  5/10
Paris by Night of the Living Dead (France 12 min) Absolutely full of action and humour. A bride and groom kick zombie butt whilst blowing up many famous Parisian landmarks. Although it is in French and doesn't come with subtitles, the action speaks for itself. Besides which, there is hardly any dialogue in it. I liked how it set up a sequel for Tokyo by Night of the Living Dead. 8/10
Savages (India 39 min) The biggest turkey of them all! Four friends enter a toxic waste dump, ignoring the signs to keep out and "bad things" happen to them. Badly acted, badly dubbed and unbelievably slow and boring. I'm still not sure why it was included as I'd hardly call it a zombie movie. 1/10
Dead Hungry (UK 10 min)  A charming and sweet film, told from a zombie's point view, as he tries to find love and brains. It works because you do feel sorry for him. 7/10

As you can see from my marks there are more good films than bad. I am very glad that this anthology has been put together, as many of these short films would have passed me by and that would have been a real shame. This is one DVD that all zombie fans should own. Overall, I'll give it a 7/10 rating.

Wednesday 20 February 2013

Fat Dragon Games' Sedan Cars

When it comes to card vehicles if you want variety (and lots of it) you should look no further than Stoelzel's Structures and/or World Works' Games. However, other card manufacturing companies make card vehicles as well, only in much smaller numbers. One such firm is Fat Dragon Games and they have produced three sedan cars so far. Here they are.
All three cars are based on the same design but they come in three different colour schemes - yellow taxi, shiny blue and light green.
The taxi is part of the original Capital City set. The blue car can be found in the McDoom's Restaurant set and the green junker car is part of the Capital City Expansion set.
My biggest gripe with these models has to do with the wheels. There is no option for making the tyres 3D. The wheels are simply part of the side of the cars and as such are as thick as the paper or card that you print the model on. This looks fine if viewed from the side or from a height but the problem is if you apply the slightest bit of pressure to the model, the wheels will buckle. Yes, I know that making 3D wheels is fiddly but to omit the option for making them is a bad decision by FDG. I added four semi-circular pieces of mounting card to each wheel and then painted them black. It didn't take that long to do and the result was more than worth it.
The taxi is a good idea for a car and this one adds a bit of variety to my WWG taxis. The green car is described as a junker, a term I hadn't heard of before but I can easily figure out what it means. This car is not in tip top condition. Note the missing hubcap from the front wheel. The front door has been replaced by a different coloured front door.
These cars are slightly larger than the sedan cars made by WWG. I haven't made any of the Stoelzel sedan cars yet, so I can't comment on how they compare in size. Note the boot (trunk, if you're American) of the junker car is a different colour to the bodywork. Can you spot what is missing from these cars? None of them have registration plates. Surely that's an offence!
The blue car looks like it has just come from a car showroom - all shiny and new. Unlike the junker car. Its front side panel has also been replaced by one of a different colour to it's bodywork. Oddly enough, I like all three, but for different reasons, and so I can't say which one is my favourite. I'm all for variety, and despite FDG's slip up with the tyres, I do like them.

Sunday 17 February 2013

Squirmydad's Winnebago

Just recently, I received an e-mail from one of my followers suggesting that I review some of the free card model vehicles that are available to download from the Interweb. His timing was good, as I had just finished making a 28mm scale Winnebago by a prolific card modeller called Squirmydad. The set comprises three pages. Page one features a white Winnebago, page two, a crimson Winnebago and page three the wheels and optional gun turrets. I have made the white Winnebago without the gun turret and here it is.
Winnebagos or RVs (Recreational Vehicles) are ideal for use in any zombie apocalypse game, combining the amenities of home with mobility. Any fan of The Walking Dead TV series and/or comic series will appreciate how useful they are.
This is essentially a box on wheels, and as such was very easy to make. Not even the front and back with their multiple angled surfaces were much of a challenge. The circles on the roof indicate where you could put the gun turret - front or middle. Seeing as the set comes with two gun turrets, I suppose you could mount both of them on the roof for extra firepower. The turrets are each fitted with a Gatling Machine Gun.
I added a thin strip of mounting card to the bottom of the front of the vehicle to act as a bumper. Oddly enough, these are supplied with the crimson version but not the white version.
This is a nice sized model. It measures 5.5" (13.5cm) long by 1.875" (4,5cm) wide by 2,25" (5.5cm) tall.
As with the front of the vehicle, I added a thin strip of mounting card to the lower back to act as a bumper. The spare tyre is not as circular as it should be but it's not easy cutting perfect circles out of mounting card.
It isn't noticeable from my photos but there are a single pair of tyres at the front and a double pair of tyres at the back.
If you'd like a copy of Squirmydad's Winnebago you can download it from here - http://gallery.papermakeit.com//albums/userpics/WinnieMMiP34.pdf
I must admit that I'm very impressed with it. It was easy to build and the texturing on the model is up to a high standard. And best of all, it's free. Yay!

Wednesday 13 February 2013

WWG Crushed Cars

I recently reviewed the garage from the WWG Mayhem Junkyard set. There are lots of interesting accessories and props in that set. Amongst the props are a small collection of crushed cars and here they are.
This photo shows you all of the crushed car models that comes with the set - five single cars, a stack of two cars and two stacks of four cars.
These were incredibly easy to make, as they are all simple box shapes. However, I did add a special Vampifan wrinkle to make them look more realistic. Before I stuck the printouts to the mounting card that reinforces each model I scrunched up the photo paper printout and then smoothed it flat with my hand. Obviously, I couldn't smooth them perfectly flat and nor did I want to. When I stuck the printout to the mounting card I was left with uneven surfaces. Once the cars have been through the car crusher they are not going to come out perfectly smooth. There will be dents and wrinkles in the bodywork. This was my simple method of replicating that effect. Believe me, it works well.
Here is my 28mm scale figure of Vampifan standing next to one of the stacks of four cars, the stack of two cars and one of the single cars.
Here is a side view of the stack of four cars and the stack of two cars, which I'm pleased to see are not all facing in the same direction.
As with all of WWG's models the texturing is just amazing. These cars really do look to be in a very dilapidated condition.
I was wondering whether to classify these as vehicles or scenery, but seeing as they can no longer drive and are just static they have to be classed as scenery. They are useful for cover or barricades and of course, you can stack as many as you want on top of each other. There are fifteen cars in total, so you could make three stacks of five cars. Or lots more if you print out more of them.
By the way, the Mayhem Junkyard set does include a car crusher, but I haven't made it yet. Don't worry, it will get made soon as i have already printed it out.

Sunday 10 February 2013

Vampifan's Power Plant

When I was running my old ATZ-BDTZ campaign, there was a scenario called "Blackout," which I ran in two parts. It occurred on Day 21 and if you want to check it out, click on the Page tab above marked "ATZ-BDTZ Bat Reps" and look for the links there. The bulk of the scenario took place in an abandoned power plant and it was in there that Team Vampifan found and recruited the Goth Girl, Rhiannon Marlow. I mention all this because I never got round to reviewing the power plant. Oops, sorry! I should point out from the start that this is a scratch-built building and is totally unique.
I was a big fan of Games Workshop's sci-fi skirmish game, Necromunda. Indeed, I still think it was one of the best games they ever produced. As a consequence, I bought just about every figure that they made for the game and lots of scenery items, including quite a few sprues of their plastic walls. Each wall measured 3" square. Long after my campaign had ended I still had loads of unused plastic walls. What to do with them? I had enough to make a really big building. Eventually, I decided I would use them as the basis for a two-storeyed power plant. The Necromunda walls were used on the front wall, the two side walls and although it isn't obvious, the back wall. The two small side walls of the entrance lobby are made of mounting card. The roof and floor are made of corrugated plastic, which is just like corrugated card but much stronger. I have checked on the GW webstore to see if the walls are still available. Typically, they aren't!
For the floor, I covered up the sides with masking tape to hide the corrugated pattern. Then I coated the exterior part in sand and cat litter, just as I do on the bases of all of my figures. My 28mm scale figure of Vampifan gives you some idea of how big this model is. It measures 9" wide by 15" long by 7.5" tall.
If you look closely at the roof section, you can see the corrugations of the corrugated plastic that I used. I have no idea where you can buy corrugated plastic from. My dad was a stamp collector and whenever he sent away for stamps they would arrive in packages reinforced by this stuff to prevent the stamps from getting creased. I ended up with loads of the stuff. The two lights were recent additions and you may recognise them as being parts of the Warhammer 40,000 set - Basilica Administratum. They are stuck to strips of mounting card, which I used to hide the joint between the Necromunda walls, as they weren't designed to be stuck at right angles to one another. This view shows the four variants of the Necromunda walls that were available - a doorway section, a blank wall piece (front and back are different)  and two types of window designs.
Here is one of the sides of the building. In hindsight, I wish I had added doors where the ground floor openings are. I suppose I could still do it but it would be impossible to make them open and close.
It looks as if the roof does not quite fit onto the top of the walls, but I can assure you, it is a snug fit. I hadn't noticed this until after I'd taken my photos of it. Ho-hum! I have obscured the detail of the Necromunda walls with squares of thin card, to which I have added four smaller squares of thin card on each wall piece. The four large exhaust pipes came from an old Revell Visible V8 Engine model that used to belong to my brother. Unfortunately for my brother, it suffered an accident when it got knocked over and fell to the floor. It smashed into lots of bits, which I confiscated and put in my "bits box" to use on other projects like this one. And before anyone accuses me of knocking it over, I didn't. It was my dad.
Here is the other side of the power plant. Whilst the Necromunda wall tiles do work well and help to give the building a very Gothic feel, typical of the Warhammer 40,000 universe, you do have to question why such a building would have so many ladders leading up to the roof. Logically, it makes no sense. Still, it is not something I dwell upon.
Here is an overhead shot of the interior, showing the big power plant in the centre of the ground floor and the catwalk surrounding it. I always knew that I wanted to add a catwalk as this would enable me to reach inside and place figures on the ground floor without having to remove the upper level. The catwalk is made of mounting card and has had small squares of thin card glued on top of it.
The large control panel in the upper centre of the rear wall came from an Urban War plastic construction set. I have no idea if this set is still on sale but it was a good set for making sci-fi scenery and buildings. I made a few buildings from it to use in my Gangs of Mega City One campaign. Fortunately for me, this particular wall piece measured 3" by 3", making it a perfect fit for my Necromunda wall section. The ladder leading up to the catwalk was scratch-built by me out of thin strips of mounting card. Fiddly to make but very effective once it got painted.
The semi-circular cylinder in between the two ladders was another piece from my bother's smashed V8 engine model.
The various control consoles that you can see dotted around the building came from an old TSR Marvel Superheroes scenario pack. I glued them to boxes I'd made out of mounting card and then stuck them in place.
The actual power plant itself is made up of five parts. Moving from left to right in the photo above are two empty tubes of epoxy resin glued one on top of the other. These lead into an engine block that was originally an accessory part for a 12" action figure of Steve Austin, the Six Million Dollar Man. Who amongst you can remember that particular toy? I'm certainly showing my age here! The engine block/power plant sits on a base made out of mounting card. Finally, is the control console, which I have described above.
I am the first to admit that this model probably bears no resemblance to a real life power plant, but do you know what? I don't care because I think it looks cool and it works fine for my gaming purposes. Surely, that is the most important consideration. Will it get a second outing in my new ATZ-FFO campaign? Who knows? At this moment, I couldn't possibly say, but it would be nice to give it another airing.

Wednesday 6 February 2013

WWG Mayhem Junkyard Garage

After I had finished making my WWG Mayhem Police Station, the next building I made was the WWG Mayhem Junkyard Garage. I have no idea why I haven't reviewed it before now. I guess it just slipped my mind. Of course, some of my followers are more eagle-eyed and alert than me, and I was recently asked when I was going to do a review of this building? That was enough to spur me into action. Seeing as I plan on reviewing a lot of my recently made card models this month, this is the perfect opportunity for me to rectify my oversight.
After making such a complex, labour intensive and time consuming project as the Mayhem City Police Station I wanted to make something a lot easier next time. This building fit the bill perfectly. It was single storey, comprising two rooms and had very little in the way of furniture to make. Perfect!
Note the air conditioning unit on the roof. That was originally part of the roof design - a 2D piece of paint work. I cut it out and added four walls to it to raise it up and to make it a 3D object. It serves as a useful handle for lifting the roof off.
This is the front of the building, with Vampifan standing in the centre, to give you a sense of it's size. It measures 12" long by 6" wide by 3" tall.

Can you see on the air conditioning unit how the three fans are slightly raised? I cut the fans out and glued them onto three circular plastic counters that, fortunately for me, were the same diameter as the fans. I painted the edges black and when they were dry they were stuck back in place. I bought my counters from EM4 Miniatures webstore. They carry a nice range of gaming accessories like plastic counters. I find them useful for my card building projects.

The only point of note about the back of the building is that I cut out the two small meters in the lower centre of the wall and glued them on to mounting card before sticking them back in place. It is just a small detail, but I wanted them raised from the wall. In real life I don't think that they would be flush with the wall.
The windows have been replaced with transparency paper, with the window tracery printed on them. It is certainly not very apparent from this photo, but you'll see what I mean when you view the interior photos.
Here is an overhead of the interior, showing the office to the left and the garage to the right. One of the things that I particularly like about WWG models is that their textures are excellent. Just check out the details on both floors. Seeing as I primarily want to use this building in my zombie campaign, the blood stains on both floors were particularly welcome and very atmospheric.
All of the furniture in the office are variants of furniture items from other WWG Mayhem City sets. By variant, I mean they are the same size and shape but they have new skins. The filing cabinet in the upper left corner is a variant of the one found in the Mayhem Police Station set. The four lockers next to it have been recoloured from those found in the Police Station. Plus, they have been reduced in size from eight lockers to four. In the garage section, the work table in the top right corner was a prop from the set that I added. The black cupboard and drawers next to it were originally just part of the wall design - totally flat. This was a stupid idea, in my opinion, so I cut them out and added two sides and a top to them, which I painted in matching colours. The clock on the wall was also cut out. I stuck that to a piece of mounting card then glued it back in place.
You can see the window tracery on the transparency papers much clearer in this photo. In the office, I have left the hubcaps and spare tyres as part of the wall design. Likewise with the tool racks on the wall between the two windows of the garage.
In the garage, the large front door is hinged along the top so that it opens inwards and upwards. It is shown half open in the photo above. The two doors in the office both open and close normally.
Once again, in the garage, the red and blue tool cupboards were simply a part of the wall design, mere 2D items. The larger cupboard next to them was a prop that came with the set. I cut out the front sections of the red and blue tool cupboards and glued them to a piece of mounting card. I added tops and sides to them, and after I had painted them, I stuck the 3D models back in place. All of the furniture items, with just one exception, look dirty, used and often rust-stained. That is true of the chair and the desk in the office. The one exception that I mentioned is the laptop computer on the desk.
Some of you may have noticed that this building made its debut appearance in the Day One scenario of my new ATZ-FFO campaign, although no one entered it, making it just a part of the scenery. It crops up in parts one, two and three of the scenario. Simply because it was so easy to make, I enjoyed making it. Obviously, it is designed to be used as part of the Mayhem City Junkyard set, but I see no reason not to use it on its own as I did in parts one and two of my ATZ-FFO Day One scenario or as part of the petrol station as I did in part three. I also think it would make a good replacement for a couple of the buildings from the Stoelzel's Structures Auto Park set.
Note that there are extra wall designs to those shown here. For example, the large window that appears at the front of the office could be placed on a side wall instead of the two smaller windows that I chose. You do have numerous optioms for how the finished product will look. My design is simply the option that I liked best. You could even split the office and the garage into two separate buildings if you wanted.

Sunday 3 February 2013

Stoelzel's Structures Warehouse

The first Stoelzel's Structures model that I made was the Cottage (see here ). That just whetted my appetite for making more of Carl's models. For my next model, I wanted to make something bigger and more challenging, so I chose to make the Warehouse, and here it is.
The first thing to note about this model is that it is big - very big! It measures 18" long by 10" wide by 10" tall. Just look how it towers over my figure of Vampifan.
This is not a model that I would recommend for beginners, as I had a few challenges to overcome when I was making it but thanks to my own card modelling ingenuity and help from Carl in rectifying some oversights of his I have made a model that I am very proud of. My review will go into greater detail and explain why this was such a challenge.
I took this photo of the underside of the roof for a very special reason. In the original instructions, the roof is made in three sections - the two central parts of the roof and the upper side windows was one piece. The two lower side roofs made up the other two pieces. I did not think that this was the best way of making the roof. I felt that it could be made as one large piece. So, I mentioned this to Carl and, lo and behold, a week later, Carl had designed an internal piece to join the three components of the roof together. I made four of these support pieces to fit to the underside of the roof, as you can see in the photo above. This was a very elegant solution to my problem and praise must go to Carl for adding this to the set. I can now lift my roof off in one piece, which makes it so much easier for accessing the interior. Notice that at the far right I have had to cut out a small rectangle from the support piece. This is so it does not obscure the window in the back wall. It also helps me to instantly identify which is the front of the roof and which is the back.
The model does not come with any signs, so I used this "West Mayhem Freight Co." sign from my WWG Mayhem Industrial set and reduced it in size to fit snugly above the doors. Seeing as I wanted this building to be a part of my Mayhem City collection of buildings, the lack of signage was not an issue with me. There is a story to tell about the front doors. Carl's original version of this model lacked any front doors. The entrance was just a gap in the wall. This was unacceptable to me. So once again, I contacted Carl and he agreed that it was an oversight. As with the roof supports, he came up with a solution and he designed these magnificent front doors and surround that you see above. This is just one of the many reasons that I have so much respect for Carl. He listens to criticism and will act upon sensible suggestions to make his product as good as possible. Would that all designers were like him!
This side view of the Warehouse shows that I have replaced the original windows with transparencies. I like to do this with all of my buildings. In the original version of this model, there was no sheet of windows for the modeller to print out onto transparency paper. I mentioned this to Carl and by now you won't be at all surprised to hear that he added two sheets of windows to the set that could be printed onto transparency paper for those who, like me, wanted that option.
When I came to build the back wall, I noticed a glaring omission - there was no back door. A building of this size would not be allowed to be built with just one entrance/exit (the front doors). My solution was to add the door you see in the photo above to one side of the back wall. The door is taken from the Stoelzel Modular Lair Base set. As with all of my doors it does open and shut. I have kept it shut as it is rarely used. You may notice that the back wall is actually in two parts - upper and lower walls. The lower part is glued in place but the upper part is removable. There is a good reason for this and I'll explain why later. I should point out that after mentioning to Carl about the absence of a back door that he has now added one to the back wall, although his is not in the same place as mine, and his matches the front door to the hidden room.
Here is the second side wall. One of the things that I like about this set is that Carl has provided thin wall columns to help hide the joins between the wall sections. The front, back and two side walls all come in three pieces. I glued 16 of these thin columns onto mounting card and then stuck them in place. They add a subtle 3D effect to the walls that I like.
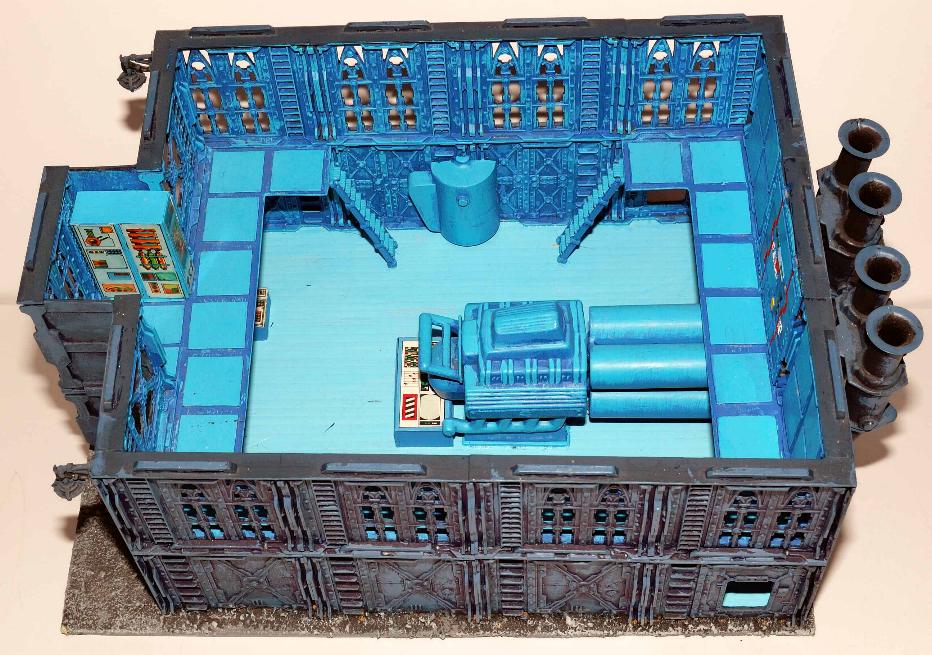
And so we come to the interior of the Warehouse and this overhead shot shows the layout that I came up with. The raised office at the back of the warehouse is a part of Carl's design and has to be included. The two support girders in the centre, attached to the side walls are an optional feature. You can add as many as you want or omit them altogether. They are designed to help keep the roof sections in place. If you go with the option of making the roof in one piece, using the new support pieces, as I did, then these girder supports are rather redundant. However, I added a pair because I like the look of them
This view, looking towards the back of the building shows what the two support girders look like. The staircase leading up to the office caused me another challenge. There was originally only one side to the stair railings - the side shown here. I got round this by printing out the page, scanning it and flipping the image through 180 degrees and then printing out that new page. This gave me my reverse side. Have no worry if you buy this set now, as Carl has rectified the problem. Notice in the office that there are two cupboards at either side of the window. I added these from Carl's Modular Mansion 3: The Asylum.
I wish I could have filled the office with furniture items from Carl's sets but unfortunately I haven't. The four filing cabinets, the desk, the computer and the two chairs are all from WWG sets (Mayhem Industrial and Mayhem Police Station), Just above the filing cabinets is a poster of a busty, topless model, which is just the kind of small detail that I like to add to my models.
Around the floor are scattered various sized crates and wooden pallets. These all come from the Warehouse set. I noticed the wooden pallets in another of Carl's sets and I told him that they ought to be in this set as well. Soon afterwards, Carl took up my suggestion and added them to the set. I just couldn't imagine a warehouse without crates, so I had to include at least some. These are all stuck in place but I could always add lots more if the scenario called for it.
Note in the office are a pile of boxes against the side wall that I added. These came from a Mel Ebbles Store Room set. They look like military foot lockers and I suppose they could be holding guns and/or ammo. I wanted my Warehouse to store more than just wooden crates and these fit the bill perfectly. Because they are being stored in the manager's office that rather indicates that they hold something valuable.
A major design fault in Carl's original version of the Warehouse was that if you followed his building instructions to the letter, there was no way to get inside the room below the office. Essentially, this room was just dead space. This was my biggest challenge that I was faced with in making this model. Perfectionist that I am, I wanted access to that hidden room. My solution was to glue the office floor and upper half of the back wall together to form an "L" shape. This section would not be glued in place. I added extra pieces of foamboard at the two sides of the hidden room so that the office floor could rest on them. you can clearly see these support walls in the photos above and below. The upper part of the back wall would rest on top of the lower part. I can lock the L-shaped section in place by simply opening the office door. The door fits snugly over the floor and stops the removable section from moving. In my mind, this is a very simple but elegant solution. I know that Carl has come up with his own idea for how to access the room below the office, which is now included with the model (with building instructions),  but that was after I'd come up with my solution.
There is very little in the back storeroom and that was a deliberate decision of mine. I did add one wooden pallet, which is propped up against the side wall. And, I just had to choose the crate marked "Top Secret" to store in this room. Who knows what is inside it? My reason for keeping this room almost empty is so that I can fill it according to the needs of a scenario. For example, it could be used to store barrels containing toxic zombies as in the film, Return of the Living Dead. Or, it could contain an arsenal of some kind. Leaving it empty gives me plenty of options for the future. That is also the reason why there is so much available space in the main room.
As you can see this really did give me the challenge I was looking for. Other, less experienced, modellers may well have given up in frustration. Fortunately, I was able to overcome every obstacle. Some, it must be admitted with the help of Carl but others, especially the hidden room, by myself. Despite everything I did enjoy making this model and the end result more than justifies all the hard work involved. However, as you can imagine, it did take far longer to make than I thought it would - roughly four months!
Please, do not be put off in making or purchasing this set because of the problems I faced. Carl has fixed everything that I mentioned to him. As a result, the Warehouse set that is available for sale now is a very different beast to the one that I purchased early last year. All of the wrinkles have been ironed out so that you can purchase in confidence.
All that remains now is to use it in my ATZ-FFO campaign. This will make a stunning centre-piece to any game-board. Obviously, I want mine for zombie gaming but just think how many other gaming genres and historical periods you could use this in. The only limit is your imagination.